Since I wanted a really special quilted lining for my current sewing-project – the Pepernoot Coat – by Waffle Patterns | yuki design and could only find unicoloured quilted lining in trade, I decided to make my own.
The instructions
Here are the instructions of how I proceeded:
-> For those who just want to read a short summary, click HERE!
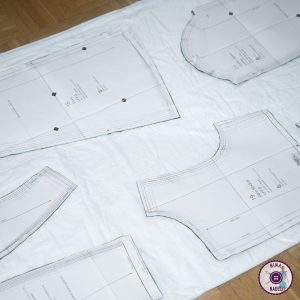
Unfortunately I only had very little of the lining taffeta I wanted to use, so I had to cut my lining pieces accurately. (the seam allowance is already included in this pattern + I cut my pieces before quilting so that the fabric fits well through my sewing machine)
Tip: If you have a little more of your desired lining material, cut your pieces with some space around them, because while quilting the fabric pulls together a little! The accurate cutting then takes place at the very end.
My cutted lining pieces (lining taffeta) I then placed on my volume fleece and cutted very roughly around them.
The warming fleece
As volume fleece I used High-Tech Thermo Insulation – fleece by MEIDA®. Despite the softness and its low thickness & weight, it is supposed to be wind resistant, highly insulating and breathable. All the features I want from a lining, especially since I have decided to use a simple cotton twill as the outer fabric for my new winter coat. The lining therefore MUST be the part that keeps me warm, because otherwise I can not wear the coat in winter without freezing and that would be really sad, because that what it is planned for!
Now place both layers (lining taffeta + volume fleece) together (left sides facing), make sure that you pin the lining as wrinkle-free as possible. It’s best to choose a slightly longer stitch length for quilting than you normally use for sewing fabrics together (I have set a stitch length between 3 & 4 on my sewing machine, normally I sew with 2), because every puncture also means a little “hole” in the fabric and thus also in the insulation.
helping tools
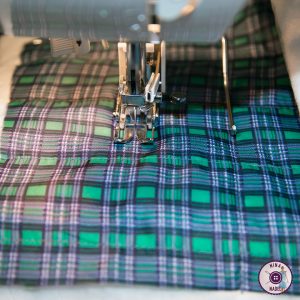
The easiest way to do the quilting is to work with a walking foot with a spacer.
It is important that you stitch the respective first seam in the middle of the fabric. Then sew the other quilting seams starting from this seam till you reach the edges of the cutted pieces. This, and if you smooth down and stretch (only a little) the lining taffeta with your fingers while sewing you avoid bumps and wrinkles. (by the way the lining taffeta – right side – is visible while quilting).
The spacer makes it much easier to get the desired quilting pattern accurate, because the spacer is always placed exactly on the already stitched seam and therefore you achive the same distance between the seams. The pattern you want to use will of course be up to you, whether straight (like me – simple squares) or diagonal (diamonds) or of course a freestyle pattern – which I think looks extremely nice especially with monochromatic fabrics.
Intermediate result
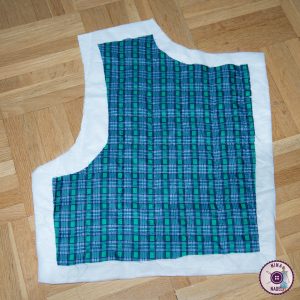
And this is how my quilted lining pattern piece looks like now (before the final cut):
Since the lining taffeta when quilting – as mentioned above – unfortunately pulls together a little, I now pinned the pattern pieces (paper) to the finished quilted lining pieces (lining taffeta + fleece) again and cut them properly. If you just cut off the protruding edges you might end up with a little too small lining. I also transfered all marks and notches at this time, so that these are really in the right place.
If you are working my way (with accurate cutted lining taffeta, without extra space) some fleece will be visible at the edges, but since (in my case) the visible fleece edges are always within my seam allowance it doesn’t bother me too much. If you want to avoid this, cut – as already mentioned above – your taffeta lining pieces a little larger and cut them at the very end properly. In the following photo you can now see one of my finished lining pieces from the front- and from the backside, at the right side you can see the small white edges.
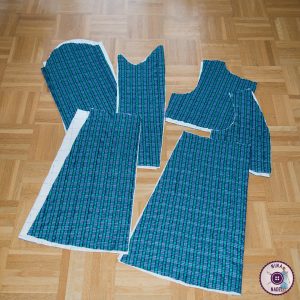
After some time, countless other quilting seams and 3 times of winding up new lower thread (as a little estimate of yarn consumption for this kind of work) I finally finished all my quilted lining. Warning: Patience and an “affection” to repetitive diligence will help a lot, otherwise this work will be very very boring. 😀
My result – my quilting lining
I have to say – all this effort really worked out for me, I have my own individual quilted lining with a fleece of my choice and can now process it as I planned, but more about this in another (soon to follow) blog entry – namely the one about my new winter coat.
Summary:
1. To ensure that everything fits well through your sewing machine, cut lining pieces (taffeta) & volume fleece (suitable for the taffeta) roughly.
2. Pin lining fabric and volume fleece together (left sides facing).
3. Sew the first quilting seam (lining fabric on top) in the middle of the fabric and work from there to the edges of the fabric. (stitch length between 3-4)
4. Smooth down the lining fabric and stretch it slightly under your fingers when sewing for a wrinkle- and bump-free result. (walking foot with spacer makes this work easier)
5. Cut your pattern pieces exactly after quilting, transferring all marks and notches at this point too.
6. Process with “your” individual quilted lining as your sewing instructions indicate.
Have fun trying it yourself! 🙂


